Safe
Water System Manual
Safe
Water System Manual

9.0
Prepare FOR production, procurement and distribution of products

Tasks:
9.1
Set up production of vessels or procure vessels
If
the project plans to sell a specially-designed vessel, the options available (as
of August 2000) are:
•
CDC vessel (Africa): Purchase from Megapak, Johannesburg, South Africa. Contact
[email protected].
•
CDC vessel (Bolivia): Purchase from PROSIN, Telephone 591-2-782498, Fax 591-2-782400.
Contact [email protected] or [email protected]
• CEPIS
vessel (Peru): Purchase from PBEX S.A., Los Calderos 120, Urb. Vulcano, Ate.,
Lima Peru, 51-1-348-3835, 51-1-348-0278
•
Ecuador vessel: Purchase from Plasticos Ecuatorianos. Contact [email protected]
or [email protected]
•
Oxfam vessel: Contact: [email protected]
If
the project plans to manufacture a special vessel in a country without current
production, the project needs to obtain molds for making the vessel, spigot and
lid (estimated cost for 3 molds was $100,000). The first step is to identify a
factory that will have the capability to manufacture the vessels and to determine
the machinery they use. Most blow-molding machines produced after 1990 are capable
of producing the special vessel, but the molds will need to be made to suit the
particular machine that will be used. After molds are made, they are shipped to
the factory, installed and tested. If a project chooses this option, it should
request technical assistance from CDC ([email protected]).
If,
instead of a specially-designed vessel, inexpensive, locally-produced or locally-acquired
jerry cans are selected as the vessel of choice, then the use of these containers
can be promoted. Alternatively, the containers can be purchased by the project
and distributed to target areas.
9.2
Set up production of disinfectant bottles, caps and labeling or procure a source
If the
project plans to manufacture a unique bottle for disinfectant, this will require
a mold for the bottle and one for the cap. The mold used to make a small bottle
in Bolivia cost $8000. Often a mold can be designed locally so a locally available
cap, such as for a soda bottle, will fit the bottle, eliminating the need for
a new mold for the cap.
If
the project plans to use a locally available bottle, make arrangements with the
manufacturer to procure a supply (and re-supplies) of the bottle. One potential
problem with this approach is that the local producer might not be able to keep
up with demand. This happened in Madagascar.
Labels
for the bottle should be carefully designed as a part of planning for education
and promotion. Options for applying labels to the bottles include:
•
silk-screening the labels directly onto the bottles, or
•
printing a paper label and gluing paper labels onto the bottles
Explore the options
available locally. Decide how the bottles will be labeled and what tasks to contract
out to local printers. If the labels will be printed on paper and applied to the
bottles, be sure to test the paper and glue before large quantities are produced.
9.3
Set up production of disinfectant or procure a source of supply
Obtain
the necessary equipment and set up for hypochlorite production (see Figure 11).
The manufacturer of the hypochlorite generator will provide detailed information
on the use of their equipment.
Below
are four different hypochlorite generators with information for contacting the
manufacturers.
AquaChlor
Equipment and Systems Engineering
Miami, Fla. USA
[email protected]
www.aquachlorese.com
Telephone
(305) 378-4101 | Clorid
Av. Gonzalez-Suarez 4-121
y Octavio Diaz
Cuenca, Ecuador
http://www.clorid.com
[email protected]
Telephone 593-7-801652 |
Dip
Cell
Magneto-Chemie B.V.
Calandstraat 109
3125 B.A. Schiedam
Netherlands
Telephone:
31-10-262-0788
31-10-262-0201 | Sanilec
Exceltec International Corp.
Sugar Land, Texas USA
[email protected]
http://www.sanilec.com
Telephone
(281) 240-6770 |
Figure
11: Requirements for installation and operation of hypochlorite generators
Hypochlorite
generator - information
on operation and maintenance from the manufacturer
-
space
-
a room exclusively for installation and operation of the equipment
-
cement floor at least 2 x 2 meters
-
ventilation _ windows opposite each other for circulation and for release of hydrogen
gas
-
locking door
Electrical
source 110-220 volts, 20 amps from battery or solar cell Water
source - piped
preferable; well is acceptable
-
close to equipment
-
clear (filter if turbid)
Salt
source Store in room in covered plastic container, away from walls, windows
and floor Operators
At least two, trained to operate and maintain equipment, bottle disinfectant,
keep records, follow distribution procedures Materials
- three
100 (or 200) liter barrels with lids. Cut 15 cm circular hole in one lid. Place
plastic spigots 5 cm from bottom in 2 places.
-
wooden benches to hold barrels
-
chairs
-
table for labeling bottles
-
plastic bottles (250 ml recommended)
-
preprinted labels or silk-screened bottles
-
storage space for bottles, supplies
-
sodium hydroxide (alkalizing agent to extend shelf life of sodium hypochlorite
solution)
-
measuring device that tests concentration of sodium
|
Figure
12 lists steps for producing hypochlorite solution on a routine basis. Before
routine production can begin, however, a critical step is trial production. Trial
production includes producing a batch of solution, assessing the chlorine concentration
of the solution produced, and making adjustments in the manufacturing procedure
as needed. This process must continue until batches of solution with the desired
concentration of chlorine are produced reliably. Trial production may take one
or several days, and requires the assistance of an experienced person.
The steps of trial
production are:
•
Follow the procedure for production of hypochlorite solution. (Refer to Figure
12, steps 1 through 10.)
•
After the machine has operated the prescribed number of hours, determine concentration
of chlorine produced (see Annex C).
•
If the concentration is less than 0.5%, this result is likely to be explained
by one of three factors that determine
hypochlorite concentration: salt concentration, time of machine operation, and
current flowing into the solution. Make adjustments to at least one of these factors
to obtain the desired concentration of 0.5% - 1.0%.
-
Increase the time of operation of the machine in increments of 1 hour until desired
concentration is reached
- Increase the concentration of salt by 10% (e.g., if 3 kg is used initially,
then use an additional 0.3 kg).
- Check the amperage produced by the machine (most machines have digital or graphic
indicators of amperage). If amperage is less than the level recommended in the
operation manual for the machine, contact the manufacturer for recommended adjustments.
•
When optimal time of machine operation and salt concentration is determined, this
procedure should be recorded and used for each production cycle.
•
Test concentration of hypochlorite after each round of production so adjustments
can be made as necessary.
(See Annex C.)
Figure
12: Procedure for Production of Hypochlorite Solution (manufacturer will provide
detailed information)
STEPS
1.
Mix completely 3 kg salt in 100 liters water in a barrel (or 6 kg in 200 liters)
2. Cover
with lid with hole
3. Place cell in solution
4. Connect cable of cell to rectifier
5. Connect rectifier to power source (wall outlet or battery)
6. Turn on rectifier _ set for 12 hours
7. Make sure amperage does not exceed 20 _ check hourly. If amps increase, turn
down amperage on rectifier
8. When finished, immediately remove cell from solution
9. Remove lid with hole and replace with lid with no hole 10.
Place cell in container with fresh water after use 11.
Test concentration of finished product (see Annex) 12.
Maintain register of each production: date, time on, time off, kg salt, liters
of water, final concentration, number of bottles filled, operator name
Maintenance
Clean
cell in 5% solution of acetic acid (vinegar) at least once a week by submerging
cell in vinegar for 1 hour
Safety
precautions Fuse
(circuit breaker) Goggles,
gloves, and apron for operators No
smoking around equipment Barrels
and spigots should be polyethylene as metal parts will corrode rapidly
To enhance shelf
life of bleach Add
NaOH to finished solution, aiming for pH of 11 to 12 If
no pH meter available, add 60 gm NaOH/100 liters of disinfectant
Packaging bleach
Plastic
250 ml bottles, opaque, with 2.5 to 10 ml cap. Add
label with dosing instructions in pictures Store
bottles in cool place away from sunlight, out of reach of children
Determine local
shelf life and discard bleach not sold 3 months before expiration |
After successful
trial production is accomplished, test the disinfectant in local water to determine
the necessary dose. The dose will depend on the turbidity of the water.
The procedure is
as follows:
•
Fill vessel with local water (it is best to use the type of vessel recommended
by project)
•
Add ½ to 1 capful of solution to the water
•
Agitate the container and let it sit for 30 minutes
•
Test treated water for free chlorine concentration
•
If concentration is between 0.5 and 2 mg/liter, dosage is adequate
•
If concentration is less than 0.5 mg/liter, add disinfectant solution. Double
the previous dose (e.g., if it was ½ capful, add another ½ capful).
Keep adding these same increments of solution until target concentration of chlorine
is reached.
•
If concentration is greater than 2.0 mg/L, then start process over, beginning
with ½ the initial test dose in a vessel of fresh, untreated water.
•
Continue reducing dose until target concentration is reached.
State the
correct dose in educational materials including on the label for the bottle. The
best dose is one that can be measured with the cap of the disinfectant bottle
(so that everyone has the same measuring device), is simple, and can be used in
as many locally available containers of different sizes as possible.
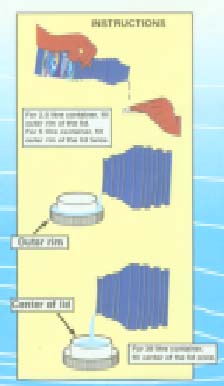
In Zambia, for
example, the disinfectant bottle had a cap with a central cup and a surrounding
rim. The instructions said to measure the correct amount of disinfectant to treat
a 2.5 liter water vessel by filling the outside rim of the cap once. To treat
5 liters, fill the outside rim 2 times; for 20 liters, fill the central cup.
In Madagascar,
the instructions were to use ½ capful to treat 10 liters of water and to
use one whole capful for 20 liters. One problem faced there was that disinfectant
was shipped to a cyclone-affected disaster area where the only available water
source was turbid river water. The dose recommended for the relatively clear water
in the capital city was not adequate for the turbid river water at the disaster
site. The dose had to be adjusted for the local water and educational material
altered to reflect this change.
Train
staff at each production site. Training should include operation and maintenance
of the equipment that produces disinfectant, safety precautions, measurement of
hypochlorite concentration, product safety, record keeping and reporting. (See
Annex C.)
9.4
Set up distribution system for products
In
section 7.0, the project planned for behavior change, using
strategies such as community mobilization, promotion, and education. Materials
included items to be displayed at points of sale and materials to explain use
of the products to families at house-to-house visits and community meetings.
In section 8.0,
the project planned pricing of the products and a system for cost recovery.
Next, to set up
the distribution system, as described in section 6.0, identify
and contact specific retailers, government health centers or other health facilities,
and other organizations that will sell the products (e.g., neighborhood health
committees). Plan the network of distribution (how products will be transported
to sellers, how health centers and other sellers will be re-supplied) and flow
of money. For example, list the exact procedures for sellers to turn in revenues
and receive a commission for vessels or disinfectant sold.
Finally,
the project will need to train health center staff, neighborhood health committees
and agents, commercial retailers, service club participants and NGO representatives
who will be involved in the sale of water storage vessels and disinfectant solution.
(See sections 10.4 and 10.9
on planning and implementing training for staff.)
9.5
List the activities and the desired outputs (quantities)
List the activities including a statement of the quantities that the project plans
to achieve. These should be the main activities and level of effort required to
achieve of the objectives specified in step 2.0. For example,
see Figure 13.
Figure
13: Production and Distribution Activities to Lead
to Achievement of the Objectives
To achieve the
following objectives: 1.
Increasing access to the intervention (products) 1.1
Sell 20,000 bottles of disinfectant in first 3 months
1.2 Sell 1,000 water storage vessels in first 3 months
The project
will implement the following activities: 1.
Place disinfectant and vessels in 60 retail shops and demonstrate consistent supply
2. Place
disinfectant or vessels in 10 health facilities 3.
Train 30 community-based distributors (such as community volunteers) 4.
Produce 1500 liters of solution per month 5.
Produce 100% of batches of solution with free chlorine > 0.4% 6.
Review sales records.
|